Transforming a dark, underutilized basement corner into a vibrant social hub is one of the most rewarding home improvement projects you can undertake. A home bar is more than just a place to store liquor; it is a statement of hospitality, a retreat for intimate conversations, and a focal point for entertainment.
Many homeowners hesitate, believing they lack the square footage or the budget for a stunning setup. The reality is that some of the most impressive home bars are born from constraints. Whether you are working with a cramped nook, the space under a staircase, or a modest wall in your finished basement, a “minibar” can offer maximum impact.
In this comprehensive guide, we will move beyond simple inspiration. We will explore the “What, Why, and How” of building a small basement bar. We will provide concrete price ranges, structural considerations, and design blueprints to help you pour your personality into your home.
Why Build a Basement Bar? Understanding the Real Value Proposition
Before swinging a hammer or ordering custom cabinetry, it is important to understand why a basement bar is more than just a luxury feature. When designed thoughtfully, a basement bar becomes a functional investment—one that adds measurable value to your property, improves your lifestyle, and creates long-term financial advantages.
Unlike trend-driven upgrades that may age poorly, a well-built basement bar taps into timeless homeowner priorities: entertainment, flexibility, and comfort.
-
Increased Property Value: A Strategic Home Upgrade
A professionally finished basement is one of the most impactful upgrades a homeowner can make, and adding a wet or dry bar significantly amplifies that value.
Real estate professionals consistently report that:
- A finished basement can return 60–75% of its total cost at resale
- A thoughtfully designed basement bar positions the home as “entertainment-ready”
- Buyers increasingly associate basement bars with luxury and lifestyle convenience
Rather than seeing the bar as an isolated feature, buyers view it as part of a complete lower-level experience—a space that feels intentional, polished, and ready to use from day one.
In competitive housing markets, this distinction matters. Homes with finished basements and built-in entertainment features often:
- Sell faster
- Attract higher-quality offers
- Stand out in online listings and showings
In short, a basement bar does not just add square footage—it adds perceived sophistication, which directly influences buyer psychology.
-
Social Utility: Creating a Dedicated Hosting Zone
One of the most underrated advantages of a basement bar is functional separation of space.
Modern households often struggle to balance:
- Family life
- Work-from-home routines
- Social gatherings
A basement bar solves this by creating a clear boundary between everyday living and hosting.
Why This Matters:
- Noise stays contained downstairs
- Guests feel relaxed without disrupting the rest of the home
- Parents can entertain without waking children
- Hosting no longer requires rearranging the main living area
This separation is especially valuable for:
- Families with young children
- Multi-generational households
- Professionals who work early mornings
- Homeowners who entertain frequently
The basement becomes a purpose-built social environment, not a temporary setup that needs constant preparation and cleanup.
-
Lifestyle Enhancement: Hosting on Your Terms
Beyond resale value and space efficiency, a basement bar dramatically improves how you experience your home.
Instead of:
- Booking reservations
- Paying premium drink prices
- Dealing with crowds and noise
You gain:
- Full control over ambiance
- Personalized drink menus
- Comfortable seating
- Music and lighting tailored to your mood
Whether it is a quiet wine night, a weekend game watch, or a small cocktail gathering, the bar becomes an extension of your personality.
This emotional value—comfort, pride, and enjoyment—is difficult to quantify but often cited by homeowners as the most rewarding benefit of the project.
-
Long-Term Cost Savings: Entertaining Smarter
While building a basement bar requires upfront investment, it can lead to substantial long-term savings, especially for homeowners who enjoy socializing.
Consider the typical cost of a night out:
- Craft cocktails: $14–$20 each
- Appetizers and tips
- Transportation or rideshare costs
- A single evening for two can easily exceed $120–$150.
Now compare that to:
- Stocking your own spirits
- Hosting friends at home
- Reusing glassware, equipment, and seating
Over time, frequent entertainers often find that their basement bar:
- Reduces monthly entertainment expenses
- Encourages more meaningful gatherings
- Delivers better value per experience
In practical terms, the bar pays for itself not overnight—but gradually, through consistent use.
-
Flexibility: Wet Bar vs. Dry Bar Options
Another advantage of basement bars is their adaptability.
- Dry bars (no plumbing) are cost-effective and easier to install
- Wet bars add sinks, refrigerators, and prep space for full-service hosting
This flexibility allows homeowners to:
- Match the bar to their budget
- Scale features over time
- Customize based on lifestyle needs
It also means the project can be tailored without overbuilding—an important consideration for resale and long-term usability.
Phase 1: Strategic Planning and Logistics
Unlike generic design galleries (like those found on Houzz), we need to address the technical “skeleton” of your bar before discussing the aesthetic “skin.”
-
Wet Bar vs. Dry Bar: The Plumbing Decision
This is the single biggest factor in your budget and layout.
- The Dry Bar: This is a station for mixing and serving only. It requires cabinetry, counter space, and a fridge, but no sink.
- Pros: Can be built anywhere; significantly cheaper; DIY-friendly.
- Cons: You must carry dirty glasses upstairs; measuring cocktails is messier without a rinse station.
- The Wet Bar: Includes a plumbed sink and drainage.
- Pros: Full functionality; higher resale value; easier cleanup.
- Cons: Requires proximity to the main stack or the installation of an up-flush pump (sewage ejector system), which can add $1,000–$3,000 to the cost.
-
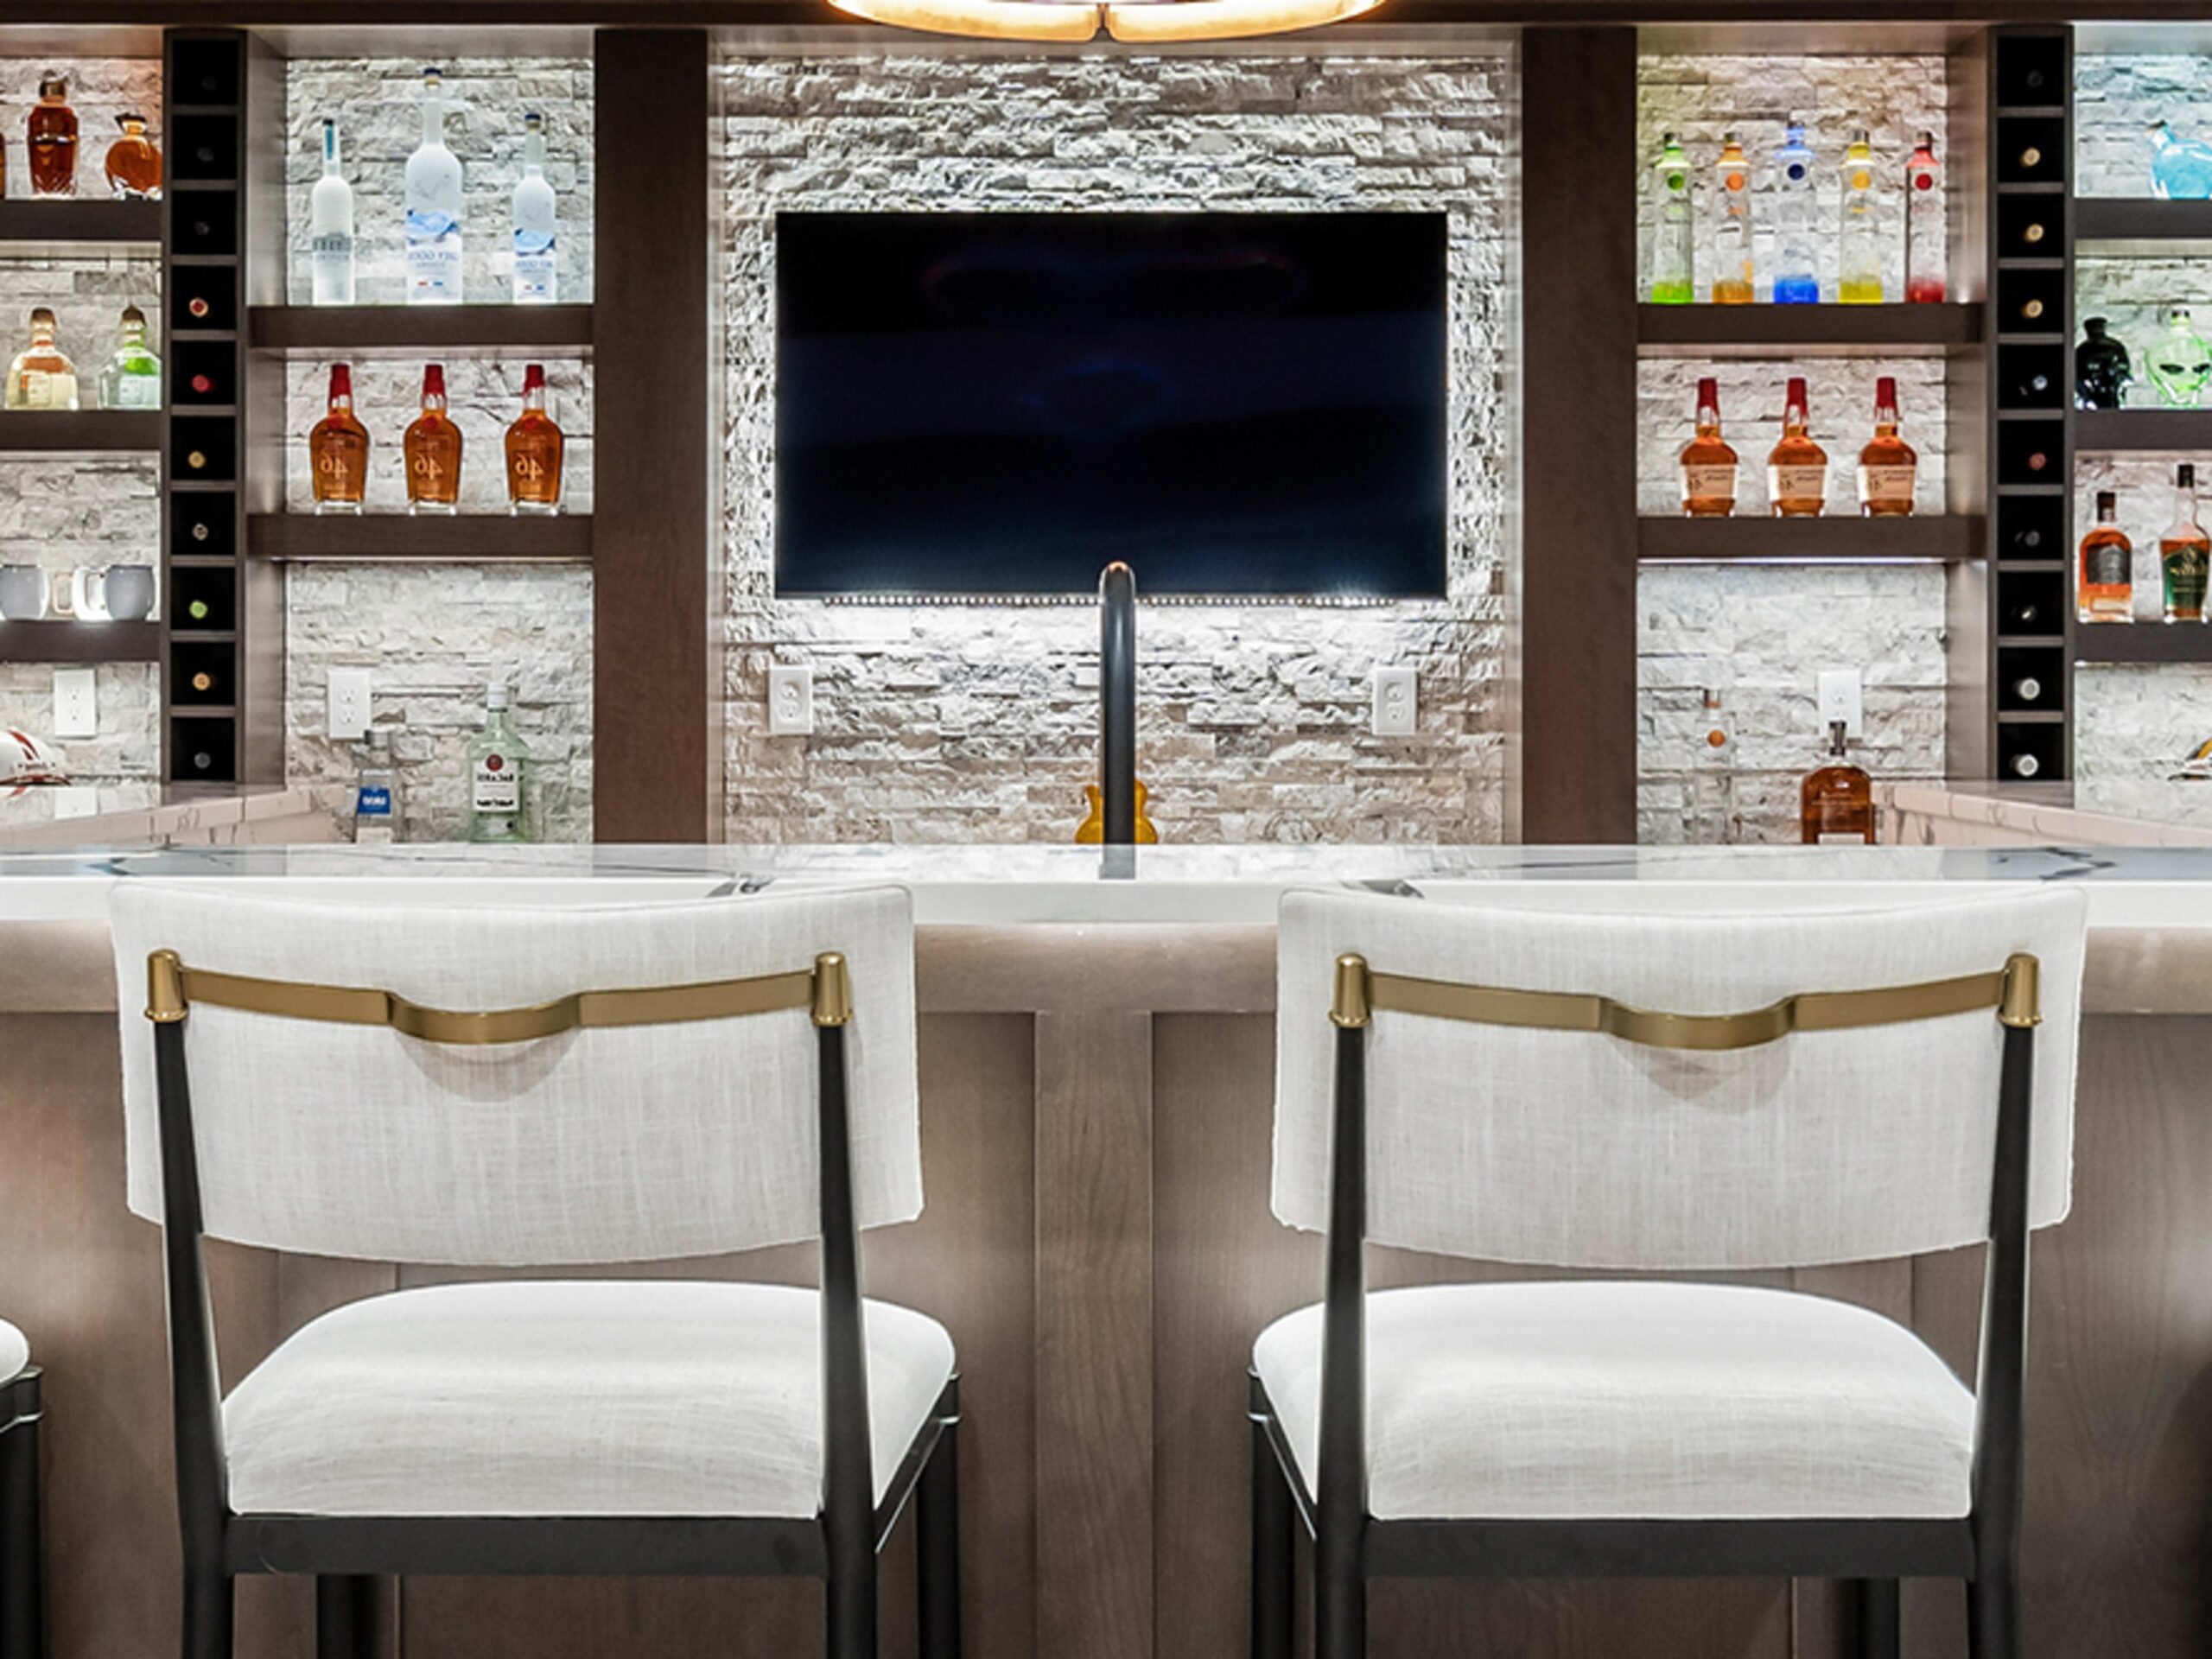
Lighting Architecture
Basements are naturally dark. Your bar needs three layers of light:
- Ambient: Recessed can lights to illuminate the general area.
- Task: Under-cabinet lighting (LED strips) so you can see what you are pouring.
- Accent: Pendant lights or backlit shelving to create the “mood.”
-
Electrical Requirements
Don’t just plug a fridge into an extension cord. A standard bar beverage center (fridge), wine cooler, and potential blender/ice maker may require a dedicated 20-amp circuit to prevent tripping breakers.
Phase 2: The Toolkit and Essential Furniture
Your original draft touched on equipment, but let’s delve deeper. To make your bar functional and durable, you need specific, high-quality elements.
The “Mise en Place” of Furniture
- The Serving Tray:
- Purpose: In a small bar, you often lack counter space. A high-quality tray (leather, teak, or hammered copper) acts as a portable countertop.
- Selection Tip: Choose a tray with high sides (at least 2 inches) to catch spills before they hit your carpet.
- The Built-in Cabinetry:
- Strategy: In a basement, moisture is the enemy. Avoid cheap particle board cabinets which can swell with humidity. Opt for marine-grade plywood or solid wood (Oak, Maple) if your budget allows.
- Dimensions: Standard lower cabinets are 24″ deep. For small basement bars, consider “shallow depth” cabinets (12″–18″ deep) to save floor space while still holding bottles.
- The Bar Cart (The Mobile Unit):
- Utility: As you mentioned, this is optional but highly recommended for tight spaces. It bridges the gap between the bar and the seating area.
- Styling: Look for carts with locking wheels. A cart with a mirror shelf can reflect light and make a small basement feel larger.
- The Seating (Ergonomics):
- The Rule of Thumb: You need 24 to 30 inches of width per bar stool. If your bar is only 4 feet long, do not try to squeeze in three stools; stick to two.
- Height: If your bar counter is standard bar height (42″), buy 30″ stools. If your counter is kitchen height (36″), buy 24″ stools.
Phase 3: Top Small Basement Bar Design Concepts (Analysis & Cost)
Here, we expand on your ideas with actionable details and estimated price ranges.
-
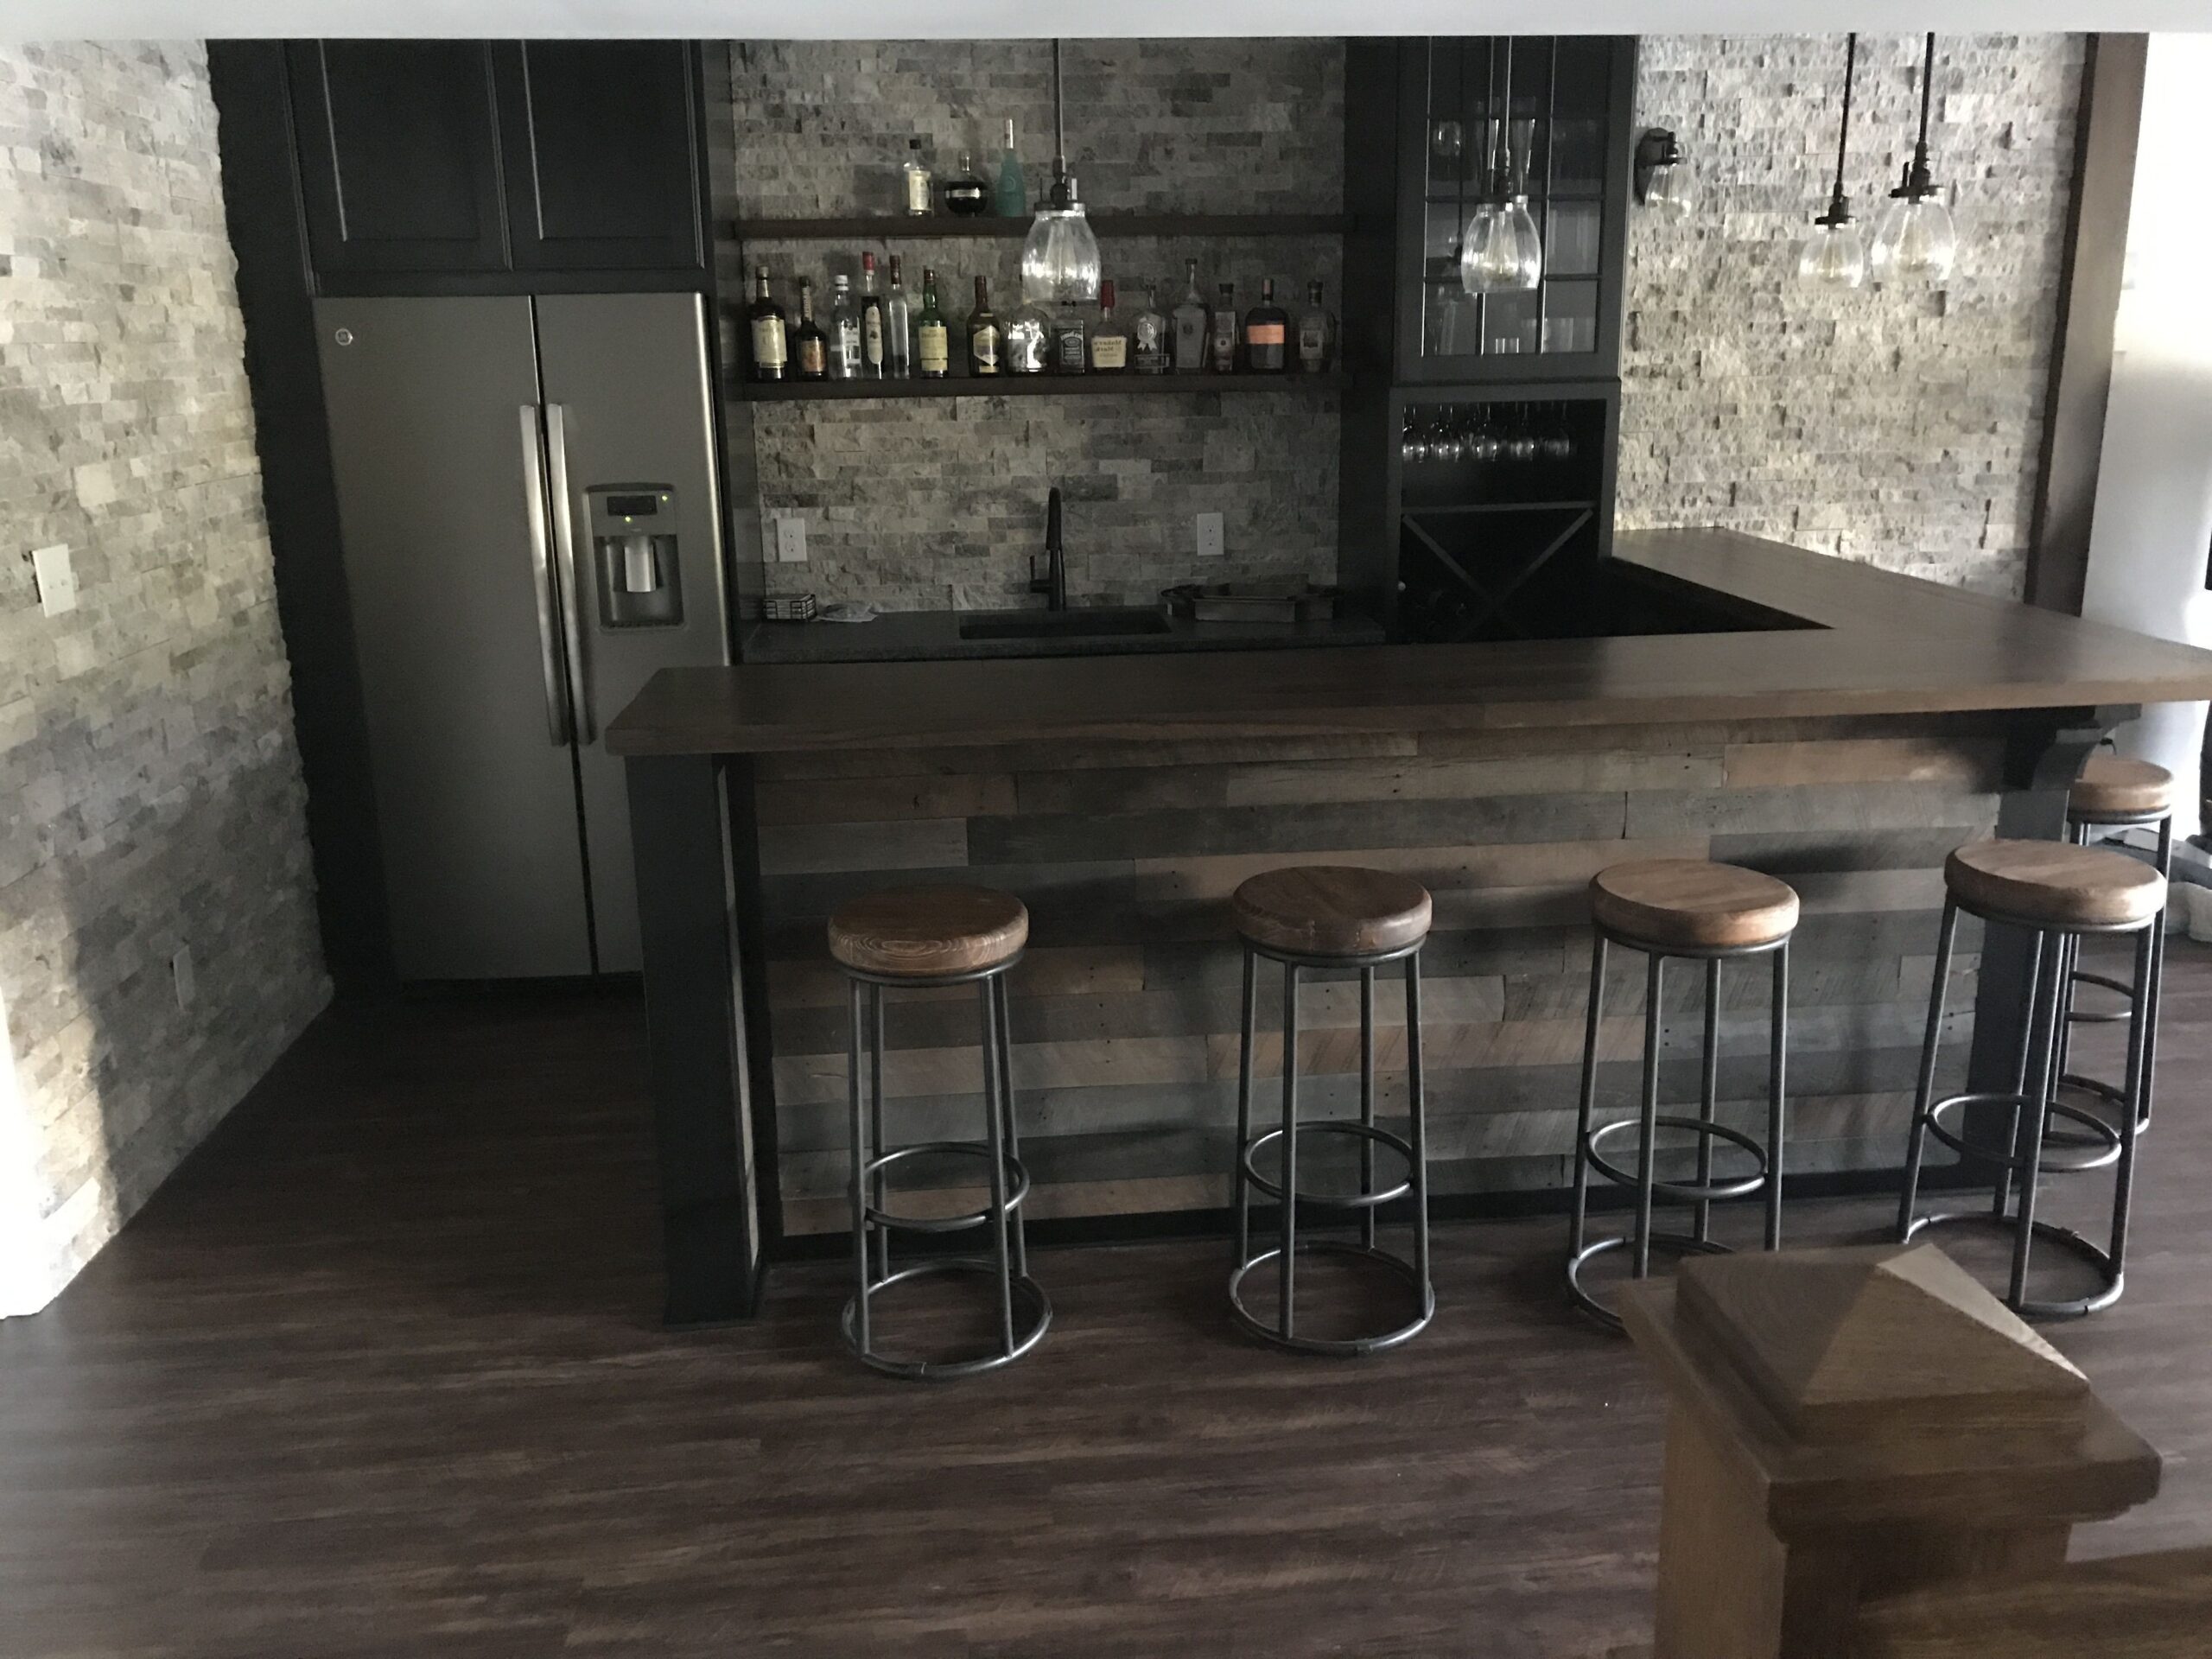
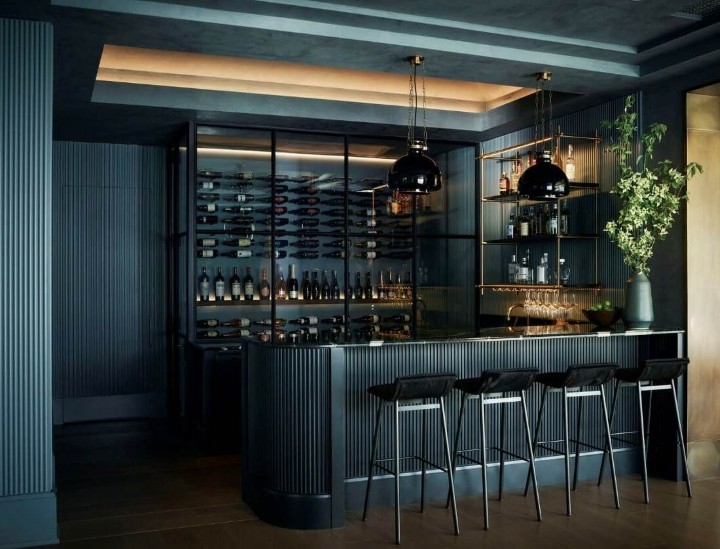
The Industrial Wooden Iron Shelf Bar
- Concept: A marriage of raw metal and warm wood. This is perfect for unfinished or semi-finished basements where exposed pipes or concrete floors are already present.
- The Build: Use black iron piping (available at hardware stores) to create open shelving units. Anchor these into the wall studs. The “counter” can be a live-edge slab of wood mounted on heavy-duty brackets.
- Why it works: It uses vertical space rather than floor space. It feels open and airy, preventing the corner from feeling cramped.
- Estimated Cost:
- DIY: $300 – $600 (Pipes, wood stain, lumber).
- Pro: $1,200+.
-
The “Floating” Modern Minimalist
- Concept: All-white or high-gloss finishes with floating shelves and a floating console.
- The Build: Secure a heavy-duty floating cabinet to the wall (ensure you hit the studs). Install LED strip lighting underneath the cabinet to create a “hovering” effect.
- Why it works: By keeping the floor visible underneath the cabinetry, the room psychologically feels larger. White surfaces reflect light, combating the “dungeon” feel of some basements.
- Estimated Cost:
- Materials: $500 – $1,500 (High-gloss cabinets, LED systems).
-
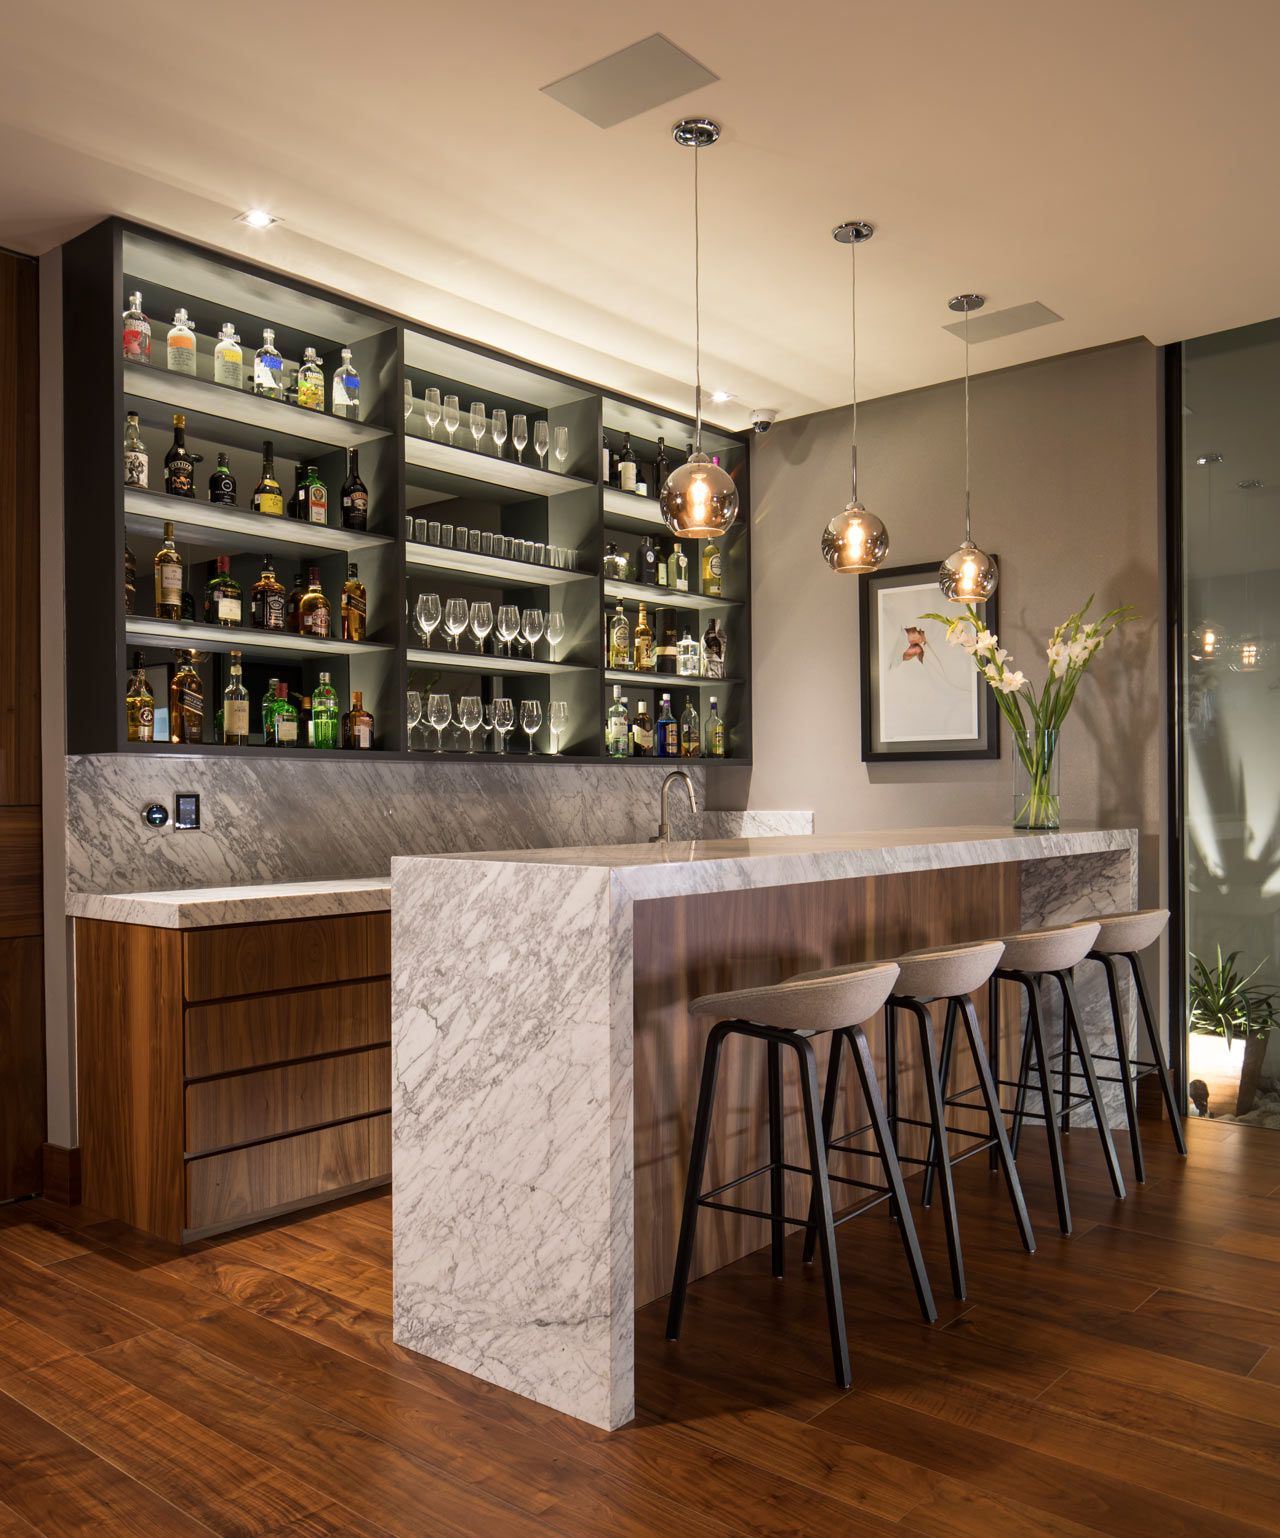
The Traditional Gentleman’s Corner
- Concept: A blend of rich wood (Walnut or Mahogany), brass hardware, and white countertops (Marble or Quartz).
- The Build: This requires precision. You are looking for closed cabinetry to hide clutter. Install a mirror backsplash behind the shelves to double the visual depth of the room.
- Why it works: It brings an upstairs level of sophistication down to the basement. It is ideal for homeowners who value tidiness, as everything has a concealed place.
- Estimated Cost:
- Mid-Range: $2,500 – $5,000 (Requires higher quality finishes).
-
The Harry Potter: Under-Staircase Bar
- Concept: Utilizing the dead space beneath the basement stairs (the spandrel).
- The Build: This is a custom job. You will need to frame out the triangular space. It is the perfect spot for a wine fridge and a row of deep drawers.
- Technical Note: Be careful of electrical wiring and HVAC ducts that often run behind stairs. You may need to reroute them.
- Why it works: It turns zero usable square footage into a premium feature. It is the ultimate space-saver.
- Estimated Cost:
- Custom Carpentry: $3,000 – $8,000 (Due to complex angles and fitting).
-
The Country/Farmhouse Style
- Concept: Cozy, textured, and welcoming. Think shiplap walls, a farmhouse sink (if plumbing allows), and barn-door style cabinets.
- The Build: Use reclaimed wood for the bar face. Install a galvanized metal bucket sink for an authentic touch. Colors should be soft greys, creams, and natural wood tones.
- Why it works: It makes a cold basement feel warm and “homey.”
- Estimated Cost:
- DIY: $1,000 – $2,500.
-
The DIY Crates & Pallet Bar
- Concept: Ultra-low budget, bohemian, and eco-friendly.
- The Build: Stack sturdy wooden apple crates to form the base of the bar. Bolt them together for stability. Sand them down heavily to avoid splinters. Use a solid piece of plywood or butcher block for the top surface. Mount crates on the wall for bottle storage.
- Why it works: It is temporary and movable. If you move houses, the bar can come with you.
- Estimated Cost:
- Budget: $150 – $400.
-
The Rustic Lodge
- Concept: Distinct from “Country,” the Rustic style is heavier, darker, and more masculine. It mimics a mountain cabin.
- The Build: Stone veneer is your friend here. Apply “lick-and-stick” stone facing to the front of the bar. Use heavy timber beams for the counter. Lighting should be warm, yellow Edison bulbs in cage fixtures.
- Why it works: It embraces the lack of light in a basement to create a cozy, “den-like” atmosphere.
- Estimated Cost:
- Materials: $1,500 – $4,000 (Stone veneer is pricey).
-
The Mini Modern Wine Lounge
- Concept: A museum-like display for wine collectors.
- The Build: This focuses on the display hardware. Use floor-to-ceiling metal wine racks (like VintageView systems) where bottles are stored horizontally. Focus heavily on track lighting to highlight the labels.
- Why it works: It turns your collection into art. It requires very little depth (only about 6 inches off the wall).
- Estimated Cost:
- Racking Systems: $500 – $2,000 depending on bottle count.
Phase 4: Concrete Price Ranges & Budgeting
To help you prepare, here is a realistic breakdown of costs for a small basement bar (approx. 6–8 linear feet) in 2026.
| Expense Category | Budget DIY ($) | Mid-Range Pro ($) | High-End Luxury ($) |
| Cabinetry | $300 (Stock/Used) | $1,200 (Semi-Custom) | $4,000+ (Custom) |
| Countertops | $150 (Laminate) | $600 (Butcher Block) | $1,500+ (Quartz/Granite) |
| Flooring | $100 (Vinyl/Rug) | $400 (LVP/Tile) | $1,000 (Hardwood/Slate) |
| Appliances | $200 (Mini Fridge) | $800 (Bev Center) | $3,000 (Kegerator + Ice) |
| Plumbing | $0 (Dry Bar) | $1,500 (Pump/Labor) | $3,000+ (Complex Lines) |
| Lighting | $100 (Fixtures) | $400 (Recessed/LED) | $1,200 (Smart Lighting) |
| TOTAL | $850 – $1,500 | $4,900 – $8,000 | $13,700+ |
Phase 5: Step-by-Step Execution Guide
You have the idea and the budget. Now, how do you execute?
Step 1: Layout & Tape
Use painter’s tape to mark the outline of the bar on the basement floor. Walk around it. Is the walkway too tight? Do you have room to pull out a stool? Adjust the tape until the flow feels right.
Step 2: Rough-Ins (For Wet Bars)
If you are adding a sink, hire a plumber now to install the rough plumbing and the sewage ejector pump if necessary. Do not attempt to frame walls until the pipes are placed.
Step 3: Framing & Electrical
Build the knee wall (the half-wall that supports the bar top) using 2×4 lumber. Run electrical lines for your fridge and outlets. Remember to put outlets on the bar layout for blenders or phone chargers.
Step 4: Cabinetry & Skinning
Install your cabinets. If you framed a wall, cover it with your chosen material (drywall, shiplap, stone veneer, or wood paneling).
Step 5: The Countertop
This is the crown jewel. If using stone, have it professionally templated and installed. If using wood, seal it with Waterlox or a marine-grade polyurethane to prevent water rings from glasses.
Step 6: The Back Bar
Install your floating shelves or upper cabinets. Ensure they are high enough (usually 18″ above the counter) to fit tall liquor bottles and blenders underneath.
Phase 6: Common Mistakes to Avoid
- Ignoring Ventilation: Basements can be damp. Fridges and wine coolers generate heat. If you enclose a fridge in a tight cabinet without ventilation grates, the appliance will overheat and fail.
- Poor Lighting: A bar that is too bright feels like a cafeteria. A bar that is too dark looks dirty. Use dimmer switches on all lights to control the ambiance.
- Overcrowding: In a small space, less is more. Do not try to fit a sink, a kegerator, a wine fridge, and a dishwasher into a 6-foot run. Prioritize what you actually drink.
- Forgetting the Outlets: You will inevitably want to plug in a margarita machine, a phone, or a smart speaker. Install USB-integrated outlets in the backsplash.
Conclusion and Recommendations
Building a small basement bar is a journey of balancing aesthetics with rigid practical constraints. It requires you to be a designer, a project manager, and a realist.
Our Final Recommendations:
- Start Small: If you are unsure, start with a “Dry Bar” using the Floating Corner (Idea #2) or Crates Inspiration (Idea #6). These require no structural changes and can be completed in a weekend.
- Invest in the Top: Spend your money on the countertop and the lighting. These are the two elements guests touch and see the most. You can save money on the cabinet carcasses or the flooring.
- Personalize: As the original text noted, this corner must reflect you. If you love sports, build the Industrial Iron (Idea #1) and mount a TV. If you love wine, go for the Modern Lounge (Idea #8).
The basement bar is the ultimate “adult sandbox.” It is a place to play with design and hospitality. Whether you are mixing a complex Negroni for a friend or just grabbing a cold beer after work, the satisfaction of doing so in a space you curated is unmatched.
Cheers to your new project!